The success or failure of your pastry is decided before it ever enters the oven; it is dictated by your absolute control over the physical state of fat.
- Butter must be plastic, not cold or soft. This allows it to stretch into micro-layers rather than fracturing or melting into the dough.
- Every pastry technique, from lamination to macaronage, is an exercise in managing temperature to control structure, crystallization, and texture.
Recommendation: Stop thinking like a cook following a recipe and start thinking like a physicist managing states of matter. Your thermometer is your most important tool.
There is a common cry of despair heard in kitchens from London to Shanghai, a frustration that unites aspiring pastry chefs everywhere. It sounds something like this: “I followed the recipe exactly, but my butter leaked out!” One baker, caught in a summer heatwave, lamented that even with the AC on, his dough was 26°C after kneading and became a sticky mess. This is not a failure of recipe, but a failure of control. The amateur baker blames the recipe; the professional masters the environment. The internet is filled with simplistic advice: “keep your butter cold,” “use European butter.” These are not instructions; they are incomplete observations.
The flaky layers of a croissant, the smooth shell of a macaron, the crisp snap of tempered chocolate—these are not culinary magic. They are the predictable results of applied physics. The secret that separates the buttery, shattering layers of a patisserie-quality croissant from a dense, greasy bread roll is not a hidden ingredient. It is a variable that is simultaneously invisible and all-powerful: temperature. More specifically, it is the precise management of temperature differentials between fat and dough, and the control of fat’s physical state from a solid block to a plastic, pliable sheet.
But what if the key was not just keeping things ‘cold’, but achieving a specific state of pliability? This is the fundamental shift in thinking. This article will not give you another recipe. It will deconstruct the science of temperature across a range of pastry disciplines. We will dissect why tart shells collapse, why macarons crack, and how to achieve professional results by mastering the one variable that governs them all. We will move beyond simple instructions and into the realm of true technical mastery.
This guide breaks down the core principles of temperature control across various pastry challenges. By understanding the physics at play in each scenario, you will develop the intuition and precision required to conquer any recipe, regardless of your kitchen’s climate.
Table of Contents: Mastering the Physics of Pastry
- Blind Baking: Why Your Tart Shell Collapses When You Remove the Weights?
- Humidity vs Meringue: Why Macarons Crack on Rainy Days?
- The “Seeding” Method: How to Get Snap and Shine Without a Marble Slab?
- Sheet vs Powder: How to Convert Gelatin Bloom Strengths?
- The Dowel Strategy: How to Drive a Tiered Cake Without it Sliding?
- Coding or Carpentry: Which Skill Best Suits a 10-Year-Old’s Motor Skills?
- Rice, Potato, Tapioca: The 60-40 Ratio for Perfect All-Purpose Mixes
- Hobby or Business: When Does Selling Sourdough Require a Commercial Kitchen?
Blind Baking: Why Your Tart Shell Collapses When You Remove the Weights?
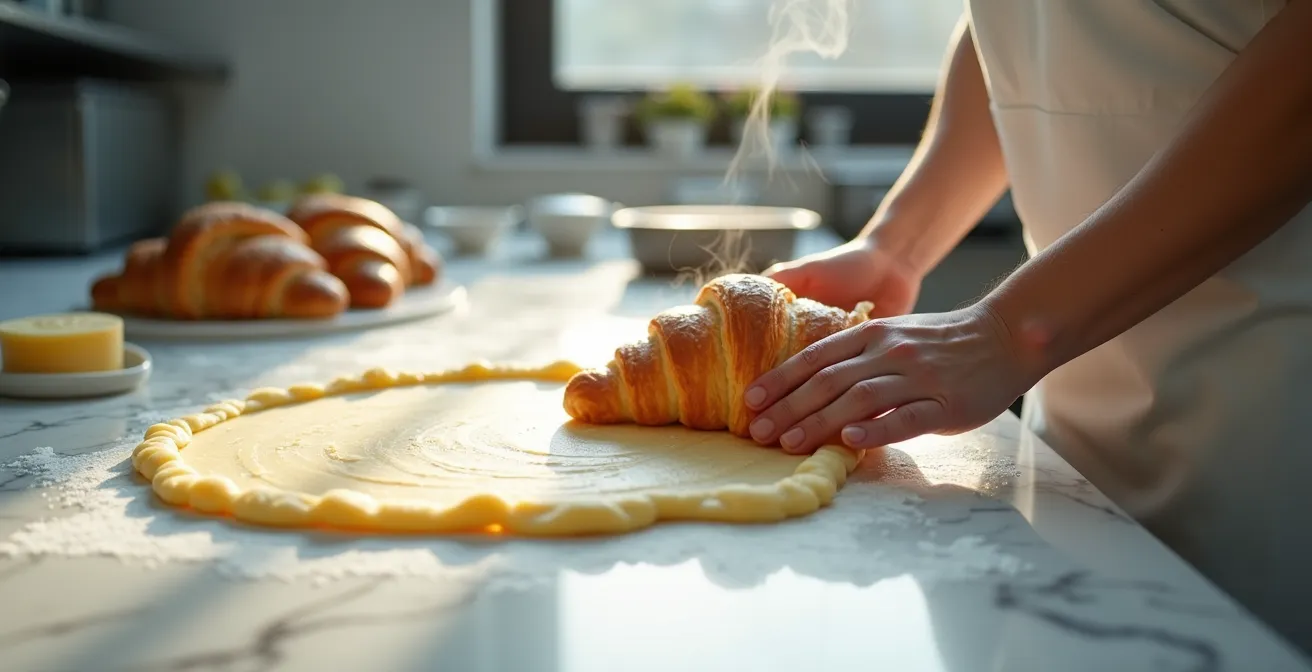
The collapse of a tart shell is a classic physics problem. It occurs when the fat—the butter—melts and liquefies before the gluten and egg structure has had time to “set” or cook. When the butter melts too early, it turns to steam and, with no structure to contain it, causes the sides of the dough to slump. The pie weights are a crutch; they physically hold the structure in place while it bakes. The goal is to create a shell that can support itself.
The solution is a dramatic temperature contrast. The shell must be thoroughly, deeply chilled—or better yet, frozen. A Canadian technique for butter tarts emphasizes that a still-frozen tart shell is key, as it prevents the filling from leaking and ensures the pastry cooks correctly. When this intensely cold dough enters a very hot oven, the exterior sets almost instantly, creating a rigid wall. This wall then traps the steam released by the butter, forcing it to create pockets and lift—the very definition of flakiness—rather than causing a collapse.
To achieve this, you must follow a strict chilling protocol. After lining the pan, the shell should be frozen for at least 30 minutes. The oven itself must be properly preheated; many baking experts recommend a temperature of 400°F (200°C) to ensure the initial heat shock is sufficient to set the crust’s structure. Your butter must be solid and cold when it enters this furnace. It is this violent meeting of cold and heat that creates a perfect, stable tart shell.
Humidity vs Meringue: Why Macarons Crack on Rainy Days?
If blind baking is a lesson in internal temperature control, the macaron is a masterclass in managing the external environment. A cracked macaron is often the result of one invisible enemy: humidity. The perfect macaron has a smooth, delicate top and a ruffled “foot” (or *pied*). This foot is created when the heat of the oven causes the air within the batter to expand, pushing the shell upwards. For this to happen correctly, the top surface of the macaron must be dry and slightly leathery before baking.
This drying phase, known as *croûtage*, allows a skin to form. On a humid day, the air is saturated with moisture, preventing the macaron shells from drying out effectively. When these damp shells are placed in the oven, the expanding air has no path of least resistance at the base. Instead, it bursts through the weakest point: the still-soft top, causing the infamous cracks. Humidity is the direct enemy of structure.
Professional bakers in challenging climates do not simply hope for a dry day; they manipulate their environment and formula. This is where understanding regional differences becomes critical. A baker in dry inland Canada may use a standard recipe, while one in humid Southern China or a coastal UK town must take active countermeasures.
The following table outlines common adaptations. Notice that the solution is always a precise, technical adjustment, not guesswork.
| Region | Humidity Challenge | Recommended Solution |
|---|---|---|
| Southern China | High humidity zones | Use dehumidifier, adjust cornstarch ratios |
| UK Coastal Towns | High humidity zones | Use dehumidifier, adjust egg white powder ratios |
| Inland Canada | Dry zones | Standard recipe works well |
| US Southwest | Dry zones | May need slight moisture adjustment |
The “Seeding” Method: How to Get Snap and Shine Without a Marble Slab?
The glossy shine and satisfying “snap” of professional-grade chocolate work are not aesthetic choices; they are the audible and visible proof of a stable crystalline structure. This is achieved through tempering, a process of controlled heating and cooling that encourages the cocoa butter’s fat molecules to align into the most stable of their six possible crystal forms (Form V).
The traditional marble slab is simply a tool for this process. Its high thermal mass allows it to pull heat out of the melted chocolate rapidly and evenly. However, it is not the only tool, and it is not the principle itself. The principle is controlled crystallization. An equally effective method, and one that requires no special equipment, is “seeding.”
In the seeding method, you melt most of your chocolate to a specific temperature, destroying all existing crystals. Then, you introduce a small amount of solid, already-tempered chocolate (the “seeds”). These stable Form V crystals act as a template, encouraging the melted chocolate’s molecules to align in the same stable structure as they cool. You are not just cooling the chocolate; you are teaching it *how* to cool. This can be done in a simple bowl. Some resourceful bakers even use the cool, flat surface of an upside-down cast iron skillet as a makeshift slab, proving that understanding the physics is more important than owning the “correct” equipment.
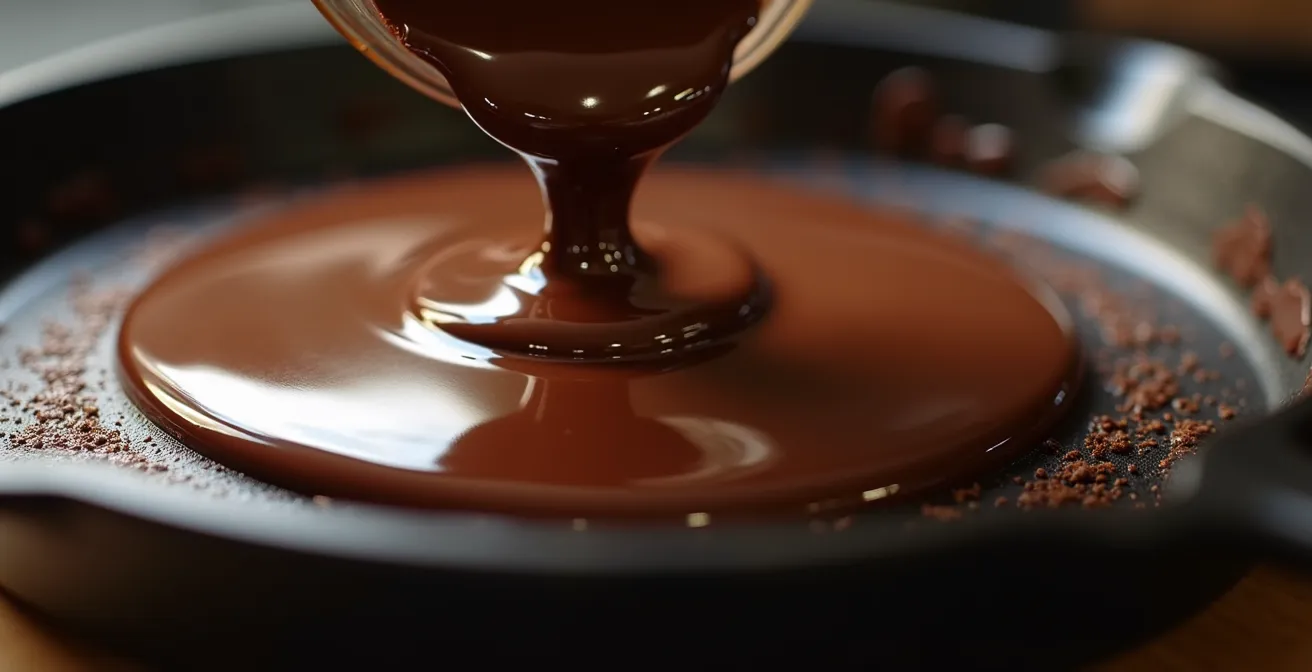
As you can see, the result is a perfectly smooth, reflective surface, evidence of a tight, stable crystal network. This result is achievable on any surface with the correct thermal properties, provided the temperature is managed with absolute precision. The seeding method is the ultimate expression of this: you are literally inserting the genetic code for the correct structure directly into the mixture.
Sheet vs Powder: How to Convert Gelatin Bloom Strengths?
Inconsistency in desserts like panna cotta or mousses often stems from a misunderstood variable: gelatin. Bakers who complain of a texture that is either too rubbery or too soft have likely failed to account for their gelatin’s “bloom strength.” Bloom is a precise, scientific measurement of the gelling power of gelatin. It is not an arbitrary quality; it is a number. A higher bloom number means stronger gelling power.
The problem arises when a recipe calls for “one packet” of gelatin or “four sheets.” A packet of Knox powdered gelatin from the USA has a bloom of 225. A silver-grade sheet common in Europe may have a bloom of 160. Dr. Oetker Gold sheets, popular in the UK, can be 220-250. Using them interchangeably without conversion is a guarantee of failure. As the experts at Pastry Workshop note:
Knox brand has a bloom of 225, while Dr. Oetker has a bloom of 220 or 250. Converting between different blooms is not that straight forward… the final texture of a certain product depends on other factors as well, so at the end of the day you just have to test and see.
– Pastry Workshop Professional Guide, Introduction to Pastry Gelatin
To be a precise pastry chef, you must be a chemist. You must account for these differences. The table below provides a starting point for conversion between common international types. Unrated gelatin from markets in China, for example, presents a major variable that must be controlled through testing.
| Type | Bloom Strength | Weight per Unit | Conversion Factor |
|---|---|---|---|
| Knox (USA) Powder | 225 | 7g per packet | Base reference |
| Dr. Oetker Gold (UK/EU) | 220-250 | 2g per sheet | 3-4 sheets = 1 packet Knox |
| Silver Sheet (Standard) | 160 | 2.5g per sheet | 4 sheets = 1 packet Knox |
| Chinese Market (Unrated) | Variable | Variable | Test with bloom ratio method |
When faced with an unknown gelatin, a professional does not guess. They perform a test to determine its properties. This is non-negotiable for consistent results.
Your Action Plan: Home Bloom Test for Unknown Gelatin
- Isolate the variable: Prepare three small, identical batches of water and unknown gelatin. Use precise ratios of water to gelatin by weight: 5:1, 6:1, and 7:1.
- Observe the bloom: Let each sample hydrate or “bloom.” Note the texture and consistency of each.
- Heat and test solubility: Gently heat each sample. The correct hydration ratio is the one where the gelatin dissolves completely and smoothly, creating a clear liquid. A lower bloom strength will require less water (e.g., a 5x ratio).
- Apply the conversion formula: Once you have an idea of its strength, use the industry-standard formula for precise conversion: Weight of Known Gelatin × √(Known Bloom / Unknown Bloom) = Weight of Unknown Gelatin Needed.
- Record your findings: Document the brand and its tested bloom strength. You are building your own technical library.
The Dowel Strategy: How to Drive a Tiered Cake Without it Sliding?
A tiered cake is not a pastry; it is an architectural structure. Its failure is a matter of engineering, not baking. The dowel system is its internal support frame, designed to transfer the vertical load (the weight of the upper tiers) directly down to the cake board, bypassing the soft cake below. This prevents the cake from compressing under its own weight.
However, dowels only protect against vertical forces (compression). They do little to prevent failure from shearing forces—the horizontal sliding of one tier across another. This sliding is almost always a temperature failure. It happens when the cake, filling, or frosting is too warm and soft to resist movement. A crumb coat of buttercream that is soft to the touch has very little shear strength. The vibrations and G-forces of transport, even just carrying it across a room, can be enough to initiate a slide.
The solution is, once again, temperature management. Each tier must be thoroughly chilled until it is completely firm to the touch before it is stacked. The final assembled cake should also be chilled until rigid. This transforms the soft components into a solid, unified block with immense shear strength. The dowels provide the vertical support; the cold provides the horizontal stability. A properly chilled and doweled cake is a monolithic structure, capable of withstanding the rigors of transport.

Think of it like this: the dowels are the steel frame of a skyscraper, and the chilled cake and frosting are the concrete shear walls. Both are required for the structure to survive an earthquake—or a drive across town. The integrity of the entire project depends on the components being in their solid, not semi-liquid, state.
Coding or Carpentry: Which Skill Best Suits a 10-Year-Old’s Motor Skills?
This question seems out of place, but it forces a critical examination of what it means to be a pastry chef. Is it like coding—a purely intellectual exercise of following a logical script? Or is it like carpentry—a craft that combines knowledge with a highly developed physical “feel” for the material? The answer is unequivocally the latter. Pastry is a haptic art. You must learn to think with your hands.
The concept of the “baker’s touch” is not a myth; it is a finely calibrated sensory tool. When a master chef presses a block of butter for lamination, their fingertips are acting as a thermometer and a rheometer, assessing temperature and pliability. They are feeling for the exact moment when the butter has the same consistency as the dough. This is the single most important factor for successful lamination. If the butter is too cold, it will shatter. If it’s too warm, it will melt. It must be plastic.
This is a motor skill, and like any motor skill, it can be trained. You do not just “get a feel for it.” You build that feel through deliberate practice, calibrating your hands against an objective tool: a digital thermometer. As one professional baker advises, a dough at 6°C (43°F) and butter at 15°C (59°F) is an ideal starting point for lamination. Your job is to memorize what 15°C butter feels like.
To train your baker’s touch, you must actively connect physical sensation to hard data. Here is a practical training regimen:
- Touch and memorize butter at 55°F (13°C). This is the cool, pliable, plastic texture you need for croissants.
- Press butter at 68-72°F (20-22°C). Learn this softness for “room temperature” applications like creaming.
- Feel butter at 80°F (27°C). Recognize this greasy, overly soft state. This is the danger zone.
- Practice by testing dough temperature with a thermometer first, then immediately with your hands to build a sensory memory bank.
Rice, Potato, Tapioca: The 60-40 Ratio for Perfect All-Purpose Mixes
When you remove gluten, you remove the default structural protein of baking. Creating a successful gluten-free pastry is therefore an exercise in engineering. You must build a new structure from the ground up using a precise combination of starches and hydrocolloids. A “60-40” ratio (60% starches like rice and potato, 40% flours with more protein like sorghum or millet) is a common starting point, but it’s a structural formula, not just a recipe.
However, even the most perfectly formulated gluten-free mix will fail if temperature is not controlled. Without gluten’s forgiving, elastic network, the role of fat in providing texture and separation becomes even more critical. In a gluten-free croissant or puff pastry, the layers are entirely dependent on the integrity of the butter. If that butter melts into the starchy dough during proofing, you will get a dense, oily brick, not flaky layers.
This makes the final proofing temperature absolutely non-negotiable. While a traditional yeasted dough might be forgiving, a laminated dough is not. The goal is to give the yeast enough warmth to produce gas for leavening, but without ever allowing the butter layers to approach their melting point. According to professional baking guides, the ideal proofing temperature is a very narrow window of 75-78°F (24-26°C). Any higher, and you risk the butter “leaking out,” destroying the hundreds of layers you so carefully created.
In gluten-free baking, you have already removed one major structural component. This makes your control over the remaining ones, like the physical state of your fat, doubly important. The ratios provide the blueprint, but temperature control is what allows the construction to be successful.
Key Takeaways
- Pastry success is governed by physics: control the physical state of fat to control the outcome.
- Temperature is not a guideline, but a precise, measurable variable that must be managed at every step.
- Develop a “baker’s touch” by calibrating your hands against a digital thermometer to internalize key temperature points for butter and dough.
Hobby or Business: When Does Selling Sourdough Require a Commercial Kitchen?
The transition from a home baker to a food entrepreneur is the point where intuitive temperature control must become a documented, legally-defensible system. When you sell food to the public, you are no longer just subject to the laws of physics; you are subject to the laws of public health. And these laws are, at their core, about temperature control.
Regulations like the “cottage food laws” in the USA or the Food Standards Agency (FSA) rules in the UK are designed to prevent foodborne illness. The primary mechanism for this is keeping perishable foods out of the “danger zone,” a temperature range where bacteria multiply rapidly. As food safety regulations define it, this zone is between 40-140°F (4-60°C). Your legal responsibility as a food business is to prove that your ingredients and products have not spent excessive time in this range.
This means your refrigerator is no longer just a cold box; it is a calibrated piece of equipment that must be proven to hold a temperature below 40°F (4°C). Your oven is not just for baking; it is for ensuring products reach a temperature that kills pathogens. This requirement for precision and documentation varies by country but the principle is universal.
The table below highlights the shift from intuitive practice to regulated procedure across different regions. In every case, moving to a business model requires an investment in verifiable temperature monitoring.
| Country | Registration Requirements | Temperature Control Requirements |
|---|---|---|
| USA | State-by-state variance | Temperature logs for Danger Zone (40-140°F) |
| UK | Register with local council and FSA | Due diligence temperature records required |
| Canada | Provincial/municipal rules (often stricter) | HACCP-based temperature monitoring |
| China | 营业执照 + 食品经营许可证 required (Business License + Food Operation Permit) | Strict commercial kitchen requirements |
Ultimately, whether crafting a single croissant for yourself or running a commercial bakery, the underlying principle remains unchanged. Mastery is not in the recipe, but in the rigorous, obsessive control of temperature. Begin today by treating your thermometer as your most essential tool and temperature as your most critical ingredient.